Affiliate links on Android Authority may earn us a commission.Learn more.
Android customization - how to make a screen recording, using ADB - root not required
June 13, 2025
Last week on ourAndroid customizationseries, we dove into a deep and involved developer tool called ADB, or Android Debug Bridge. Our purpose last week was pretty simple, we were trying tohunt down apps that were eating up the batteryon our Android devices, and we used logcat to do so.
This week, now that you’ve got ADB up and rolling, let’s keep using it. I have a short list of tasks I want to perform with ADB, but we will start off with the most fun of them all, capturing a screen recording on your Android device.

Before we get started
You do not require any special apps or to have root on your device to follow along today, or for any of our upcoming ADB tasks in the coming weeks. You will, however, need to have a connected computer with ADB setup and ready to roll.
You will need to at least follow alongour previous project to see how ADB is setup and enabledon your connected computer, and be ready to connect with an appropriate USB cable for your Android device.

Warning:The screen record functionality in ADB is for video only,it does not capture the audioof your device, please be prepared to capture audio separately, if required. The recording is limited to about 3 minutes in length, to help prevent copyright violations, I presume. Screen rotation is not supported, pick an orientation and stick with it for the recording.
Capture a screen recording with ADB
First things first,connect your Android device to your PC. Follow any steps required toenable ADB,fire up your command/Terminal windowand get ready to rock.
In your command or Terminal window, enteradb devicesand hitenter.

As mentioned last week, you do not really need to do this, but it is always nice to see that your device is connected and reporting to your computer properly.
Now, enteradb shelland hitenter.
Shell enables a subset of new tools within ADB, and, in a manner of speaking, provides access to the command line controls of your actual device. If that does not make sense, don’t worry about it, we’ll have the chance to explain in more detail at a later date.
Enterscreenrecord /sdcard/video.mp4and hitenter.
You are now recording your Android device display.
To stop the recording, wait for three minutes to expire, or simplypress Ctrl+Cinto the command/Terminal window.
The video file is saved to your Android device, and will be located where you specified above, which would be on your /sdcard/ if you entered the exact text above. Feel free to specify a new storage location on your device, and a new file name as well, be careful not to run the command again right away, as it may overwrite your previous video.mp4 file.
What’s next
Our implementation above utilizes the bare bones defaults of the screen record tool. There are additional options available that may be of use to you.
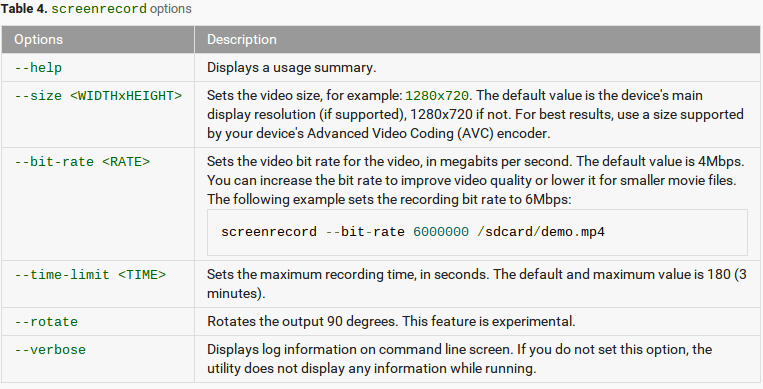
First, the default will record the video at your device’s screen resolution, if supported. If you have issues, try specifying a specific screen resolution. The general format is to add –size WIDTHxHEIGHT to your command. For example,screenrecord –size 1280×720 /sdcard/recordings/my720pvideo.mp4. Consult your manufacturer for supported resolutions on your Android device’s AVC encoder.
You can also control the bit-rate and recording time (up to 3 minutes.) Head on over to theADB help pages for more details– fair warning, our next few Android customization posts will cover our favorite tools on that ADB page, feel free to jump ahead if you wish. For now, the following image has the few supported screen record options for you.
Now that you have a screen recording or two saved to your Android device, you may want to get it off the device and onto your computer. We have talked aboutfile transfersbefore on ourAndroid customizationseries, but we’ve got ADB at our disposal now, so let’s use it. Next week, we will use ADB to transfer files to and from your computer and Android device.
What do you use a screen recording for? Work, entertainment, send to a friend to show them a problem you are having?
Thank you for being part of our community. Read ourComment Policybefore posting.
