Affiliate links on Android Authority may earn us a commission.Learn more.
Exploring Android P’s slices: Creating interactive and dynamic slices
August 19, 2025
The hard work isn’t over just because you’ve successfully released your app and built up a user base. Once you’ve found your audience, you need to hang onto them!
At this year’s I/O, Google announced Android slices, a new feature to help keep users engaged with your application. Android slices appear in places where many Android users spend a lot of time, including Google search results, so they’re an effective way to keep users coming back to your application.

By the end of this article, you’ll have created two slices: a simple slice that launches an Activity, and a dynamic slice that lets users interact with your app, from outside of the application context.
What are Android slices?
Android Slices are snippets of your app’s content displayed outside of your application. They will be debuting in Google search, and Google plans to add slice support to other applications and areas of the operating system in the future.
Slices can display a range of content, including text, images, video, live data, scrolling content, and deep links, as well as interactive controls such as toggles and sliders. Slices can also be dynamic, updating to reflect events happening inside your application.

Imagine you’ve installed an app for booking tickets for your local cinema. The next time you’re Googling the latest blockbuster, you’ll get the usual search results, and maybe that application’s “Book Now” slice. This lets you reserve tickets to see this movie at your local cinema, without having to navigate away from your search results.
From the user’s perspective, this slice has provided them with quick and easy access to the feature they needed at that exact moment. From the developer’s perspective, this slice got their application in front of the user in a relevant context, and successfully re-engaged them.
Android Slices are also part of Android Jetpack, so they’re supported on everything from Android 4.4 onwards. If you add slices to your project, according to Google the slices have the potential to reach 95 percent of all Android users!
Create your first slice
Slices can perform a range of actions, but let’s keep things simple for now and create a slice that launches our application’sMainActivity.
Start by creating a new project using thelatest canary build of Android Studio 3.2, then open your project’sbuild.gradlefile and add theandroidx.slicedependencies. To keep things consistent, I’m also using the AndroidX namespace for the other dependencies.
At the time of writing, the process of creating a slice sometimes caused Android Studio to automatically add duplicate slice-core and slice-builders dependencies. If you’re encountering strange error messages, check yourbuild.gradlefile to make sure this hasn’t happened.
Create your slice provider
A slice provider is the component that lets you display slices outside of your application, including in Google search results.
To create a slice provider:
Every time a host application needs to display a slice, it’ll send a binding request to your slice provider, with the Uniform Resource Identifier (URI) of the slice it wants to display. The slice provider will then callonCreateSliceProvider()and build the slice by calling theonBindSlice()method. Finally, theonBindSlice()method will return the slice and pass it to the host application.
If you open yourMySliceProviderclass, the automatically generated code provides an overview of this process:
SinceSliceProvideris a content provider, it has to be declared in your project’s Manifest. When you create a slice provider using Android Studio by going toNew… > Other > Slice Provider, this declaration gets added to your Manifest automatically:
Making your Android slices interactive: Creating a Slice Action
If this Android slice is going to launch our application’sMainActivity, we need to make some changes to the slice provider:
Define a SliceAction
You make a slice interactive by creating one or more slice actions. ASliceActioncan consist of a title, an icon, and aPendingIntent, which handles user interaction in your slices.
I’m going to define a single slice action to launch our application’sMainActivity.
Then, I’m going to mark this as the slice’s primary action, so it’ll trigger whenever the user interacts with any part of the slice:
Define the slice’s content
Although you can customize your Android slices to a degree, ultimately they’re templated content. You cannot precisely position a slice’s UI elements like when defining an application’s layout via XML files.
To build a slice’s user interface, you need to implement aListBuilder, specify the type of rows you want to display, and define the content for each row.
For now, let’s keep things simple and use a basicRowBuilder, which supports all of the following content types:
To keep things simple, I’m going to create a single row, consisting of a “Launch MainActivity” title.
This is all you need to create a functioning slice. However, since slices are still an experimental feature, you’ll need to jump through a few hoops before you can experience this slice in action.
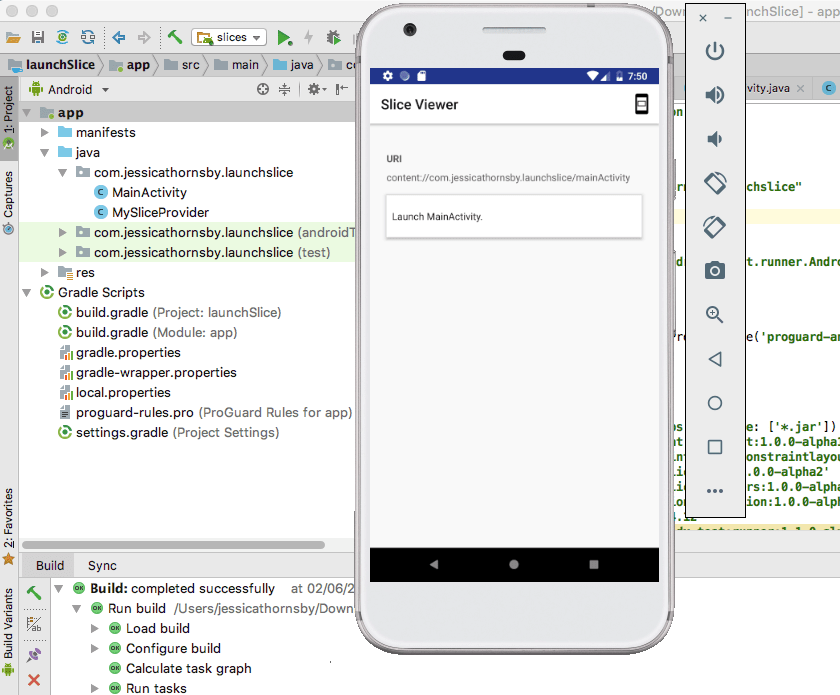
Testing Android slices with the Slice Viewer
At the time of writing, you can only test your Android slices using Google’s Slice Viewer application, which emulates how slices will eventually appear in Google search results.
To install Slice Viewer:
cd /Users/jessicathornsby/Library/Android/sdk/platform-tools
./adb install -r -t slice-viewer.apk
Next, you’ll need to create a slice run configuration, and pass it your slice’s unique URI:
slice-content://com.jessicathornsby.launchslice/mainActivity
This app will now be installed on your Android device. Slice Viewer will request permission to access your app’s slices; tap Allow and your slice should appear onscreen.
Give the slice’s “Launch MainActivity” button a click, and the slice should respond by launching your application’sMainActivity.
Download the finished application from GitHub.
Creating a dynamic slice
Let’s move onto something more exciting and create a dynamic slice, which allows users to interact with the related application directly from the slice’s user interface.
This second application is going to display a value the user can increase and decrease, either from the application itself, or from the slice. Regardless of whether the user changes the value in the app or the slice, the new data will be synced across both components, so they’ll always have access to the latest data.
To build this slice, either create a new project, or update your existing application. If you do decide to create a fresh project, then you’ll need to repeat the following setup:
Create the application layout
Start by creating the application’s user interface.
Open your project’sactivity_main.xmlfile, and create an “Increase” and a “Decrease” button, plus aTextViewto eventually display the application’s dynamic value:
We also need to create a string resource that’ll display our dynamic value:
Creating vectors with the Vector Asset Studio
In the slice, I’m going to display “Up” and “Down” arrows that change the application’s value when tapped:
Repeat the above steps, but this time select the ‘Arrow downward’ icon and give it the name “ic_count_down.”
Updating a slice at runtime
Every time the user increases or decreases the value, we need to make sure our slice knows about it!
To inform a slice about changes, our app needs to callcontext.getResolver.notifyChange(Uri, null), which will trigger theonBindSlice()method and cause the slice to be rebuilt with the new content.
Creating a multi-choice slice
In our second slice provider, we need to complete the usual steps (such as implementingonCreateSliceProviderandonBindSlice), plus the following:
Here’s the finishedMySliceProviderclass:
Handling the slice’s intents
Finally, we need to create the broadcast receiver for retrieving each new value, and informing the slice provider whenever it needs to rebuild the slice:
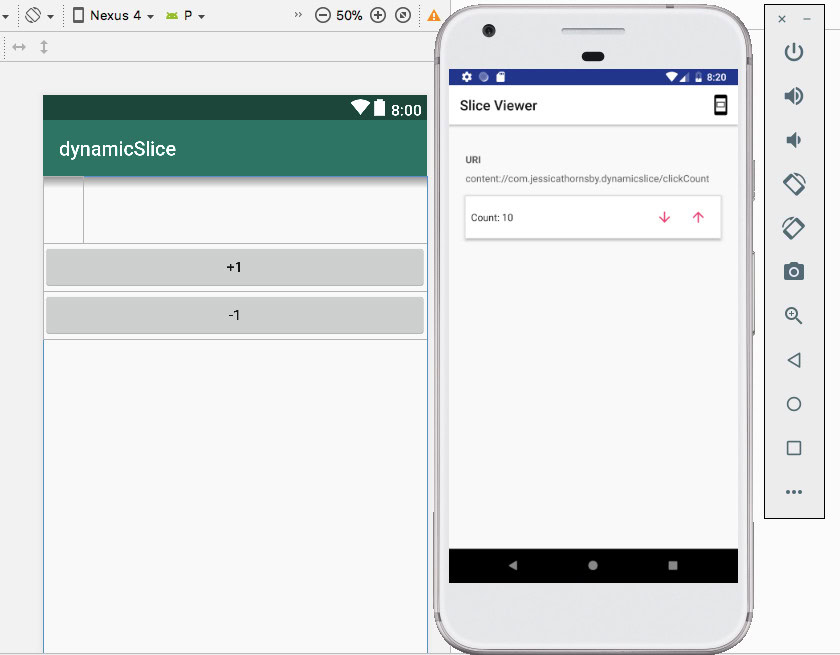
Put your dynamic slice to the test
To test this slice, you’ll need to create a second run configuration that passes this particular slice’s unique URI:
slice-content://com.jessicathornsby.dynamicslice/clickCount
Your slice will now appear in the emulator or connected Android device.
To put this slice to the test, tap its “Up” and “Down” arrows, and switch to your application’sMainActivity. Tap either of the application’s “Increase” or “Decrease” buttons, and it should start counting from the value you created in the slice, rather than from zero. If you switch back to the slice, you should find the value has updated automatically.
Download the complete project from GitHub.
Wrapping up
Now you know how to implement this new feature. Will you be using slices in your own Android projects? Let us know in the comments below!
Thank you for being part of our community. Read ourComment Policybefore posting.
