Affiliate links on Android Authority may earn us a commission.Learn more.
Hassle-free fragments: Using Android’s Navigation Architecture Component
June 11, 2025
During2018’s I/O conference, Google announced a new approach for developing Android apps.
Google’s official recommendation is to create a single Activity that serves as your app’s main entry point, then deliver the rest of your application’s content as fragments.

While the thought of juggling all those different fragment transactions and life cycles may sound like a nightmare, at I/O 2018 Google also launched theNavigation Architecture Componentwhich is designed to help you adopt this kind of single Activity structure.
In this article, we’ll show you how to add the Navigation component to your project and how you’re able to use it to quickly and easily create a single-Activity, multiple-fragment application, with a little help from Android Studio’s new Navigation Editor. Once you’ve created and connected your fragments, we’ll improve on Android’s standard fragment transitions by using the Navigation component and Editor to create a range of fully-customizable transition animations.

What is the Navigation Architecture Component?
Part ofAndroid JetPack, the Navigation Architecture Component helps you visualize the different routes through your application and simplifies the process of implementing these routes, particularly when it comes to managing fragment transactions.
To use the Navigation component, you’ll need to create a Navigation Graph, which is an XML file describing how your app’s Activities and fragments relate to each other.
A Navigation Graph consists of:
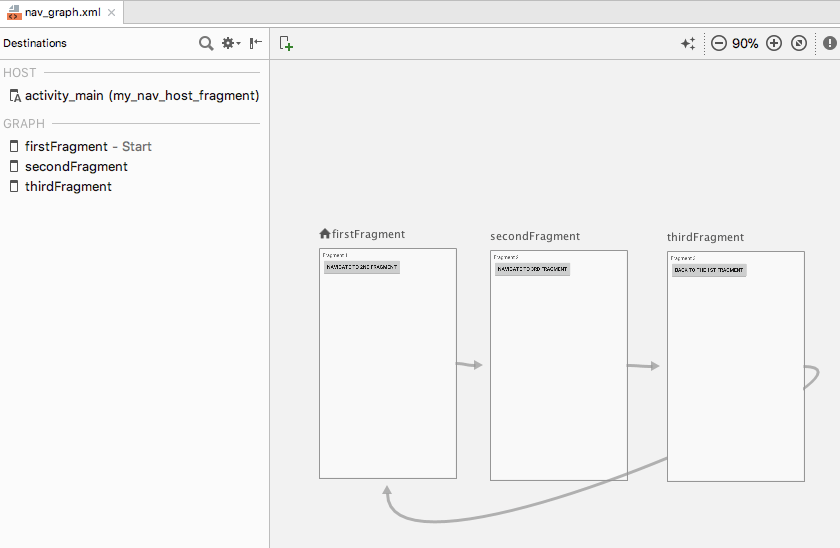
you may view a visual representation of your project’s Navigation Graph in Android Studio’s Navigation Editor. Below, you’ll find a Navigation Graph consisting of three destinations and three actions as it appears in the Navigation Editor.
The Navigation component is designed to help you implement Google’s new recommended app structure, where a single Activity “hosts” the Navigation Graph, and all your destinations are implemented as fragments. In this article, we’ll follow this recommended approach and creating an application that consists of a MainActivity and three fragment destinations.
However, the Navigation component isn’t just for applications that have this recommended structure. A project can have multiple Navigation Graphs, and you’re able to use fragments and Activities as destinations within those Navigation Graphs. If you’re migrating a large, mature project to the Navigation component, you may find it easier to separate your app’s navigational flows into groups, where each group consists of a “main” Activity, some related fragments, and its own Navigation Graph.
Adding the Navigation Editor to Android Studio
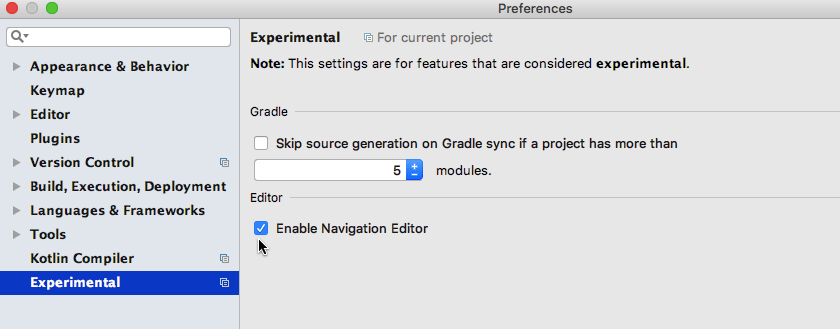
To help you get the most out of the Navigation component, Android Studio 3.2 Canary and higher features a new Navigation Editor.
To enable this editor:
Project dependencies: Navigation Fragment and Navigation UI
Create a new project with the settings of your choice, then open its build.gradle file and add navigation-fragment and navigation-ui as project dependencies:
Get a visual overview of your app’s navigation
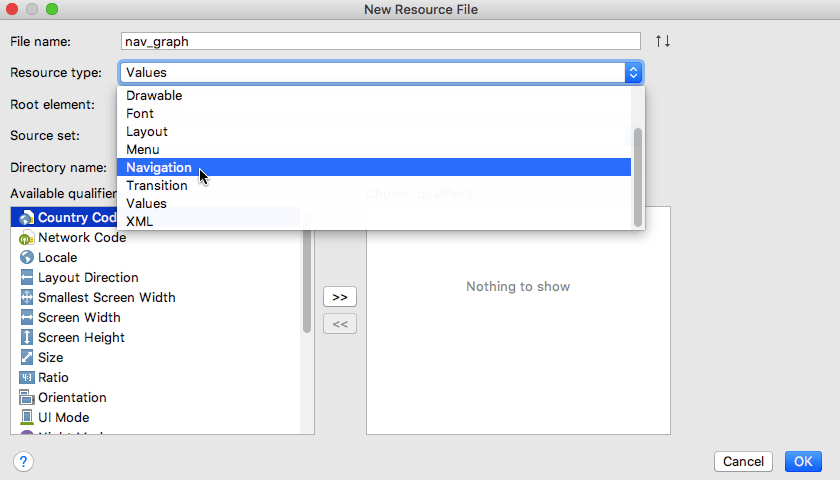
To create a Navigation Graph:
Open your “res/navigation/nav_graph” file, and the Navigation Editor will launch automatically. Similar to the layout editor, the Navigation Editor is split into “Design” and “Text” tabs.
If you select the “Text” tab, you’ll see the following XML:
The “Design” tab is where you can build and edit your app’s navigation visually.
From left-to-right, the Navigation Editor consists of:
Populating the Navigation Graph: Adding destinations
Our Navigation Graph is currently empty. Let’s add some destinations.
you’re able to add Activities or fragments that already exist, but you can also use the Navigation Graph to quickly and easily create new fragments:
A FirstFragment subclass and corresponding “fragment_first.xml” layout resource file will now be added to your project. FirstFragment will also appear as a destination in the Navigation Graph.
If you select FirstFragment in the Navigation Editor, then the “Attributes” panel will display some information about this destination, such as its class name and the ID you’ll use to reference this destination elsewhere in your code.
Rinse and repeat to add a SecondFragment and ThirdFragment to your project.
Switch to the “Text” tab and you’ll see that the XML has been updated to reflect these changes.
Every Navigation Graph has a start destination, which is the screen that’s displayed when the user launches your app. In the above code, we’re using FirstFragment as our app’s start destination. If you switch to the “Design” tab, then you’ll notice a house icon, which also marks FirstFragment as the graph’s start destination.
If you’d prefer to use a different starting point, then select the Activity or fragment in question, and then select “Set Start Destination” from the “Attributes” panel.
Alternatively, you can make this change at the code level:
Updating your fragment layouts
Now we have our destinations, let’s add some user interface elements so that it’s always clear which fragment we’re currently viewing.
I’m going to add the following to each fragment:
Here’s the code for each layout resource file:
Fragment_first.xml
Fragment_second.xml
Fragment_third.xml
Connecting your destinations with actions
The next step is linking our destinations via actions.
You can create an action in the Navigation Editor using simple drag and drop:
There should now be an action arrow linking FirstFragment to SecondFragment. Click to select this arrow, and the “Attribute” panel will update to display some information about this action, including its system-assigned ID.
This change is also reflected in the Navigation Graph’s XML:
Rinse and repeat to create an action linking SecondFragment to ThirdFragment and an action linking ThirdFragment to FirstFragment.
Hosting the Navigation Graph
The Navigation Graph provides a visual representation of your app’s destinations and actions, but invoking these actions requires some additional code.
Once you’ve created a Navigation Graph, you need to host it inside an Activity by adding a NavHostFragment to that Activity’s layout file. This NavHostFragment provides a container where the navigation can occur and will also be responsible for swapping fragments in and out as the user navigates around your app.
Open your project’s “activity_main.xml” file and add a NavHostFragment.
In the above code, app:defaultNavHost=”true” allows the Navigation Host to intercept whenever the system’s “Back” button is pressed, so the app always honours the navigation described in your Navigation Graph.
Triggering transitions with NavController
Next, we need to implement a NavController, which is a new component that’s responsible for managing the process of navigation within a NavHostFragment.
To navigate to a new screen, you need to retrieve a NavController using Navigation.findNavController, call the navigate() method, then pass either the ID of the destination that you’re navigating to or the action that you want to invoke. For example, I’m invoking “action_firstFragment_to_secondFragment,” which will transport the user from FirstFragment, to SecondFragment:
The user will move to a new screen by clicking a button, so we also need to implement an OnClickListener.
After making these changes, FirstFragment should look something like this:
Next, open your MainActivity and add the following:
MainActivity also needs to implement the onFragmentInteraction() method, which allows communication between the fragment and the Activity.
Adding more navigation
To implement the rest of our app’s navigation, we just need to copy/paste the onViewCreated block and make a few tweaks so that we’re referencing the correct button widgets and navigation actions.
Open your SecondFragment and add the following:
Then, update ThirdFragment’s onViewCreated block:
Finally, don’t forget to add the ThirdFragment.OnFragmentInteractionListener interface to your MainActivity:
Run this project on your Android device or Android Virtual Device (AVD) and test the navigation. You should be able to navigate between all three fragments by clicking the different buttons.
Creating custom transition animations
At this point, the user can move around your app, but the transition between each fragment is pretty abrupt. In this final section, we’ll use the Navigation component to add a different animation to each transition, so they happen more smoothly.
Every animation that you want to use must be defined in its own animation resource file, inside a “res/anim” directory. If your project doesn’t already contain a “res/anim” directory, you’ll need to create one:
Let’s start by defining a fade-out animation:
Repeat the above steps to create a second animation resource file, named “slide_out_left,” then add the following:
Create a third file, named “slide_out_right” and add the following:
you’re able to now assign these animations to your actions via the Navigation Editor. To play the fade-out animation whenever the user navigates from FirstFragment to SecondFragment:
If you switch to the “Design” tab, then you’ll see that this animation has been added to “action_firstFragment_to_secondFragment.”
Run the updated project on your Android device or AVD. You should now encounter a fade-out effect whenever you navigate from FirstFragment to SecondFragment.
If you take another look at the “Attributes” panel, you’ll see that “Enter” isn’t the only part of the transition where you can apply an animation. You can also choose from:
Try experimenting by applying different animations to different parts of your transitions. you may alsodownload the completed project from GitHub.
Wrapping up
In this article, we looked at how you’re able to use the Navigation Architecture component to create a single-Activity, multiple-fragment application, complete with custom transition animations. Has the Navigation component convinced you to migrate your projects to this kind of application structure? Let us know in the comments below!
Thank you for being part of our community. Read ourComment Policybefore posting.
