Affiliate links on Android Authority may earn us a commission.Learn more.
Let’s make a simple Star Wars quiz!
July 12, 2025
If, like much of the internet, you would currently say you’re in a “Star Wars mood” then you may feel like testing your knowledge to see if you really know your Sith from your Jedi. Maybe you want to test your friends?
In this post, you’ll see how to build a complete Star Wars quiz with your own questions. Or, if you prefer, you can change the subject entirely. Make it a quiz about horticulture or ancient history. Just don’t expect to get as many takers…

Building a quiz is aperfect early projectfor those starting out, as it only requires a few basic skills. It’s also pretty fun and won’t take too long (maybe, oh I don’t know, 7 minutes?). I’ll explain everything as we go, but it would be good if you already have a little background knowledge before starting, or are willing to do some further research to better understand everything. Of course, I assume you already haveAndroid Studio and the Android SDKinstalled and set up.
With that out of the way, let’s dive in and give it a shot.
If you get stuck, just use the force!
Setting up
The first thing you need to do is create a new project with an empty activity. I called mine Quiz.
Then jump into the layout editor in order to set up your XML. In other words, add and position the views (buttons, text, images) the way you want them on the page.

Most activities will be made up of a java file and an XML layout file, calledMainActivity.javaandactivity_main.xmlrespectively. The XML defines where buttons and text go and the java tells them how to behave and interact with the user.
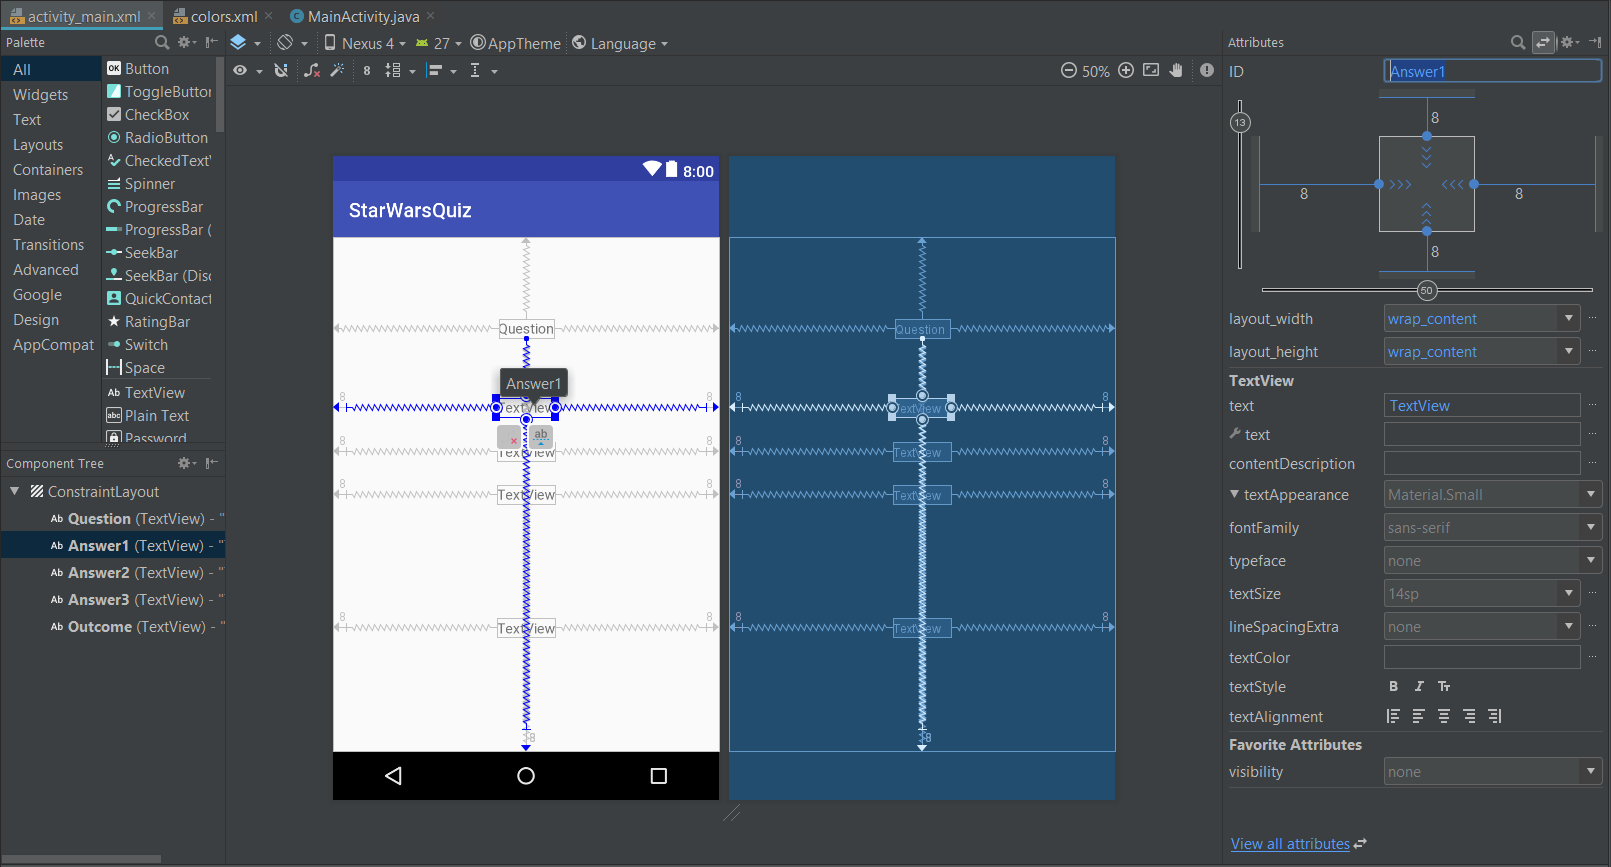
Open upactivity_main.xmlandclick the “Design” view tab down the bottom. Start dragging and dropping the elements you want to use from the box on the left to the view on the right. For now, place 5TextViews(views that show text) wherever you like. Each will have one of these functions:
This is a constrain layout, which means you need to define the position in relation to each other and the edges of the display. You do this by grabbing the edge of the view, dragging it to an anchor point on all four sides, and then positioning it between those coordinates.
When you select a view, you’ll see the option to edit some attributes on the right. Remove the text for now — we’ll add it later — and set an ID for each one. The IDs are what we use to identify our views from within the code. We’ll use these IDs:
Finally, you’re going to set anonClickfor the three answers. This will let you register a user tapping on the TextView from within the code. Select each view, scroll to the bottom of the attributes window, and then select “View All Attributes.” Now find where it saysonClickand enter the following respectively:
Adding questions
Hop intoMainActivity.java. This shows us the java code controlling the behavior of our views. There’s some “boilerplate code” already here, which basically tells the program to act like an activity and to find the right XML file as soon as the activity is created.
The first thing to do is store the questions and answers in a map. This is a list of strings (words) which each have an index and a value of our choosing. That means we can store our questions and answers with logical indexes to retrieve later.
To define a new map, you need this bit of code, placed outside the method:
If anything comes up underlined in red, you’ll need to click on the word and then hit Alt+Enter to import the relevant class, adding the necessary functions to your Android program.
So, our map is called “questions” and now, inside theonCreatemethod (a block of code that runs as soon as the program is created), we can populate the map with the questions and answers.
So, if I write:
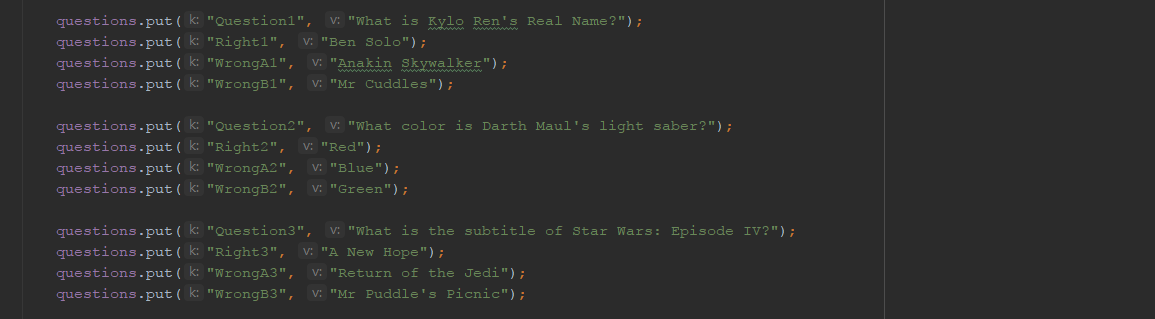
I have created a new entry where the value is “What is Kylo Ren’s Real Name” and the “key” is “Question1.”
Create as many questions this way as you like, making sure to label them correctly as Question1, Question2, Question3, and so on. Likewise, make a right answer for each one, labelled Right, and two wrong answers for each, labelled WrongA and WrongB.
Here are some examples:
The good thing about this method, is that we can logically retrieve the next question and its respective questions and answers as we go.
Showing the questions
Now you’ll need to add some code. Don’t worry if this next part is tricky. Take your time reading through it. You should find it fairly logical.
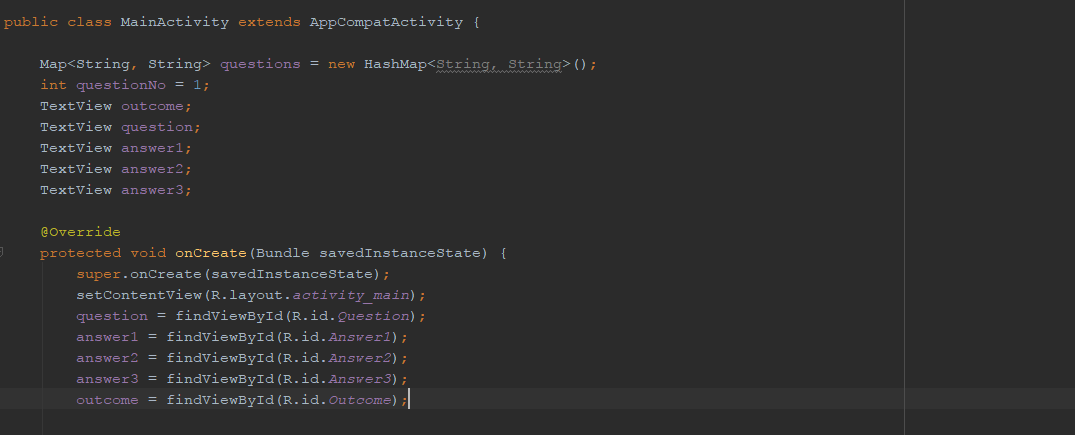
First, we need to create some variables and object references, which will be available throughout the program. So outside of theonCreatemethod, write:
questionNois an integer — a whole number — which we will use to keep track of which question we are on.
Back inside theonCreate, after the line which startssetContentView, you need to locate the views in your code like so:
setContentViewtells Java you’re using the XML sheet you designed earlier, which means you can now find the relevant views by using the IDs you gave them earlier.
Now create a new method. A method is any piece of code that is conveniently grouped together inside curly brackets with a name that you can use to “call” it later.onCreate()is a method for example. A method that says “private void” at the start is a method that doesn’t return any values and that won’t be used outside of this program.
Your method will be calledsetQuestion()and in here we will be collecting all the code necessary to show the questions and answers.
Here’s how it will look:
As you can see, this is simply getting strings — sequences of text — from the map and showing them on theTextViewswe created.
If you writesetQuestion();at the bottom of theonCreate()method, you will “call” this block of code and it will launch at the start of the program once the views have been identified.
Because we’re getting the question using the integerquestionNo(“Question” +questionNomeans “Question1”), we can increase this value subsequently in order to get each next question.
We are also setting a “tag” on one of the views, which is a useful reference for us to see which of the answers is correct. For now, the correct answer is always going to be the first option.
If you run the program at this point, you should see your first question, though you won’t be able to interact with it.
Letting the user play
Next, we need to let our users play the game!
This is nice and easy. When we set ouronClickvalues in the XML layout file earlier, we basically told Android we would be creating a method (group of code) which would run when eachTextViewwas clicked.
These methods will say “public void” because they’re interacting with another script. Here is the first one:
This code tells us that whenAnswer1is clicked, we will get the tag from that view. If the tag says “Correct,” then we will say well done on theOutcome TextView. Then we’ll progress to the next question and reload the questions and answers. An “If” statement like this works just as it does in Excel; as long as the logic in the brackets is accurate, the code in the following curly brackets will execute, otherwise the code following the “else’”will.
If the tag isn’t the one that says “Correct,” then we say “Sorry, wrong answer!” and the game won’t progress until the user selects the right one.
Now do the same thing foronAnswer2Click()andonAnswer3Click(), with the same code. If we wanted to be a little more elegant, then we could use a globalonClickListener, but I think this method is easiest to understand for beginners!
Here’s a good articleon choosing the right kind ofonClickListener.
Random generator!
I used to play a drinking game that involved shouting “random generator” and then pointing at someone who would have to drink. It wasn’t much of a game.
We need a different kind of random generator right now — one which randomizes our answer order.
The best way to do this is load our answers into a list, which gets randomly sorted and used to populate theTextViews.
It could look like this:
So we’re creating a new list, then filling it with possible answers from our map, then shuffling it and adding it to the views. Finally, we check if the view has the right answer and then add the tag “correct” if it does!
You could likewise shuffle the questions themselves if you wanted to, by creating a list of numbers and then shuffling that to change thequestionNointeger.
Final touches
It’s looking pretty good now, but there are still just a few things to tweak before we can call it a day. The app currently crashes as soon as it reaches the end of the list of questions, which isn’t the nicest “farewell.” We can fix that by simply stopping the app once ourQuestionNogets to a certain point.
Because every question has 4 elements in the map (the question and three potential answers), the size of the map will be four times greater than the number of questions. Therefore, we can just say:
This will show “Well Done!” once the player gets to the end of the quiz. Easy!
You can also polish things up a little to make your app look the part. You can change the color scheme for instance by heading to thecolors.xmlfile in your project (app > res > values > colors.xml). You can change text color of your views in the attributes window. You can also change the background of your app by adding the following line to youractivity_main.xml:
Finally, you could add a logo at the top by using an image view and choosing the image in attributes. Simply add the graphics you want to use toapp > res > drawableand ensure they are all lower-case names with no spaces. The finished article could look something like this:
Closing comments
With that, you now have the basic skeleton for your quiz. You can add more questions of your own, or change the topic entirely if it pleases you. This could be the foundation of a study aid, as well as a game, and developing it in either of these ways will provide the perfect challenge to hone and develop your skills further.
You’ll go to the head of the class if you can you figure out how to let users add their own questions.
Check out the recent post onSQLitefor a clue as to one way you could do it.
Thank you for being part of our community. Read ourComment Policybefore posting.
