Affiliate links on Android Authority may earn us a commission.Learn more.
Using a simple SQLite database in your Android app
July 04, 2025
I recently published a tutorial describing the different available methods tostore data locally in an Android app. However, due to article length constraints, I could not adequately cover creating and using an SQLite database for data persistence. In this tutorial, I delve into how to use an SQLite database in more detail.
What is SQLite.
SQLite is a relational database management system, similar to Oracle, MySQL, PostgreSQL and SQL Server. It implements most of the SQL standard, but unlike the four database engines mentioned above, it is not a client-server database engine. Rather, it is embedded into the end program. What this means is that you’re able to bundle a SQLite database with your application, and get access to all the power of a relational database within your application. SQLite is native to both Android and iOS, and every app can create and use an SQLite database if they so desire. In fact, in Android, device contacts, and media are stored and referenced using SQLite databases. An exciting tidbit of information is that SQLite is the most used database engine in the world, and quite possibly themost widely deployed software ever. To read more about SQLite databases, visit theSQLite web site.
Preparation
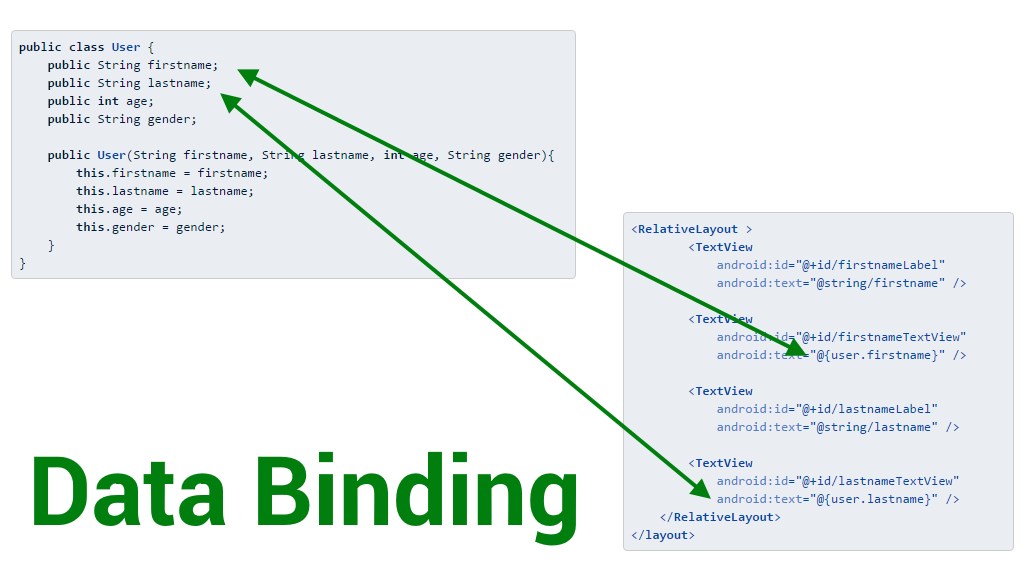
Regular readers of this series will notice that we’ve recently begun using the Android data binding techniques for tutorials. If you are not familiar with the concept, check out my previous article discussingAndroid data binding. Also, we use recyclerview to display lists, as alsodiscussed previously. You may want to read both if you aren’t familiar with the concepts.
To enable data binding in your app, you must add the following to your app build.gradle file

Also, to use both recyclerview and cardview to display lists, you must include the relevant libraries to the dependencies section in your app build.gradle file (24.2.1 was the current library version at the time of writing).
Finally, some SQL experience will be very helpful, although you will still be able to follow the tutorial without previous experience with SQL. However, to unlock the full possibilities of using an SQLite database, you must study SQL syntax.
Sample app description
For the sample app, we are going to create two tables, an Employer table and an Employee table. The Employee table will contain a foreign key reference to the Employer table, and we will show how to insert, select, update and delete rows from tables. We will also demonstrate how easy it can be to display items selected from an SQLite database in a RecyclerView (list) and in a Spinner.
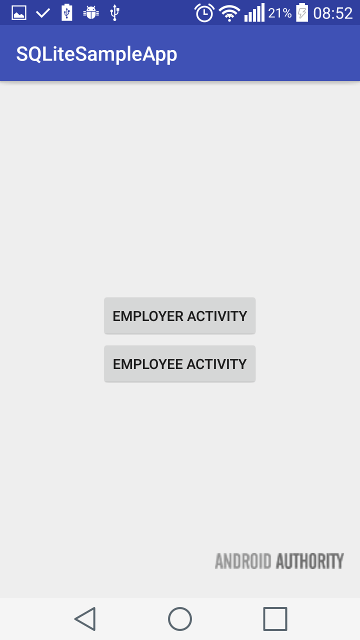
We’ve got a MainActivity, from which we can navigate to either the EmployerActivity (for operating on the Employer table), or the EmployeeActivity (for operating on the Employee table).
SQLite database storage classes
Storage classes refer to how stuff is stored within the database. SQLite databases store values in one of five possible storage classes:
With this in mind, lets create some tables.
Define your tables
Since the SQLite database is local to your application, you will have to ensure your app creates database tables and drops them as needed. You have to maintain your database through code. Let’s begin by creating the Employer table first, along with the EmployerActivity. It’s good practice to abstract your SQLite database creation logic into a class. This helps with maintainability. We call our class SampleDBContract.
We define a private constructor for SampleDBContract so that it won’t be accidentally instantiated, and then we create a class to represent the Employer table. Note that Employer class implements the BaseColumns interface. The BaseColumns interface provides two very useful columns to our table. These are the _ID column, which will be auto incremented whenever a new row is inserted in the table, and a _COUNT column, which can be used by ContentProviders to return a count of the number of records returned from a query. We don’t require the _COUNT column. The CREATE_TABLE string, compiles to the following SQL statement:

So far, we have simply defined the Employer table schema.
Create database with SQLiteOpenHelper
The easiest way to manage database creation and versioning, is to create a subclass of SQLiteOpenHelper. SQLiteOpenHelper will ease the management of your SQLite database tremendously, by opening databases when needed, creating databases if they do not exist as well as upgrading or downgrading as necessary. You only have to override the onCreate() and onUpgrade() methods, to specify the actions you need performed to create and/or update the database.
It is that easy. The database version starts at 1, and we give our SQLite database a name (sample_database). The constructor simply calls the super class’ constructor, with the database name and version. In onCreate, we tell the SQLiteDatabase object to execute the Employer CREATE_TABLE SQL statement. Finally, onUpgrade, we drop the Employer table and re create it. In your case, you may wish to run ALTER statements or whatever complex steps your app requires to move add/remove the necessary columns and tables.

Insert data into your SQLite database
The Employer table has three main columns, the name, description and founded_date columns. Clicking the save button calls the saveToDB() method.
Within saveToDB(), we get a reference to a SQLiteDatabase object, using SQLiteOpenHelper’s getWritableDatabase() method. This method will create the database, if it doesn’t yet exist, or open it, if it has already been created. getWritableDatabase returns an SQLiteDatabase object, which allows read/write access.
There are four important things to note in the code snippet above:
Select data from your SQLite database
Similar to the getWritableDatabase() method above, we can call the SQLiteOpenHelper object’s getReadableDatabase() to get an SQLiteDatabase object that can be used for read access to the database. It is worth mentioning that the SQLiteDatabase object returned by getReadableDatabase() is the exact same read/write database returned by getWritableDatabase(), except if there is a constraint such as the file system containing the database being full, that forces the database to open read only.
The readFromDB method is going to query the database, and return all rows from the Employer table where the Employer name matches part or all of the value in the nameEditText, and the same with the description, and where the company was founded after the date input in the Found Date EditText.
In the final query method above, projection is a String array, representing the columns we want to fetch, selection is a String representation of the SQL WHERE clause, formatted such that the ‘?’ character will be replaced by arguments in the selectionArgs String array. You can also group, filter and/or sort the query results, none of which we do here. Inserting data into an SQLite database using the method above protects against SQL injection.
Take note of the object returned by the query. A Cursor object. In the next section, we are going to show how easy it is to display the results of a Cursor using RecyclerView.
Display Cursor contents in a RecyclerView
A Cursor provides random access to the result set returned by a database query. This means that you can access values at any location in the cursor, much like Java Lists and/or Arrays. With this knowledge, we can implement a RecyclerView using a Cursor in pretty much the same way we implement RecyclerView using ArrayLists. Rather than calling List.get(i), with a Cursor, you move the Curosr to the desired position, using moveToPosition(). After moving the Cursor to the desired position, you call the appropriate getXXX(int columnIndex) method, where XXX is either one of Blob, Double, Float, Int, Long, Short or String.
However, instead of bothering about the correct column indices from our readFromDB() method above, we use the helpfully provided getColumnIndexOrThrow() method, which fetches the index of the named column, or throws an Exception if the column name doesn’t exist within the Cursor.
Defining foreign keys
To recap, thus far, we’ve created an Employer table, which we have populated with rows of content. We, now intend to create an Employee table, which is related to the Employer table through the Employer _ID column.We define an Employee class that extends BaseColumns, in the SampleDBContract class (similar to how we defined the Employer class). Note that in the create table String for Employee, we included the String “FOREIGN KEY(employer_id) REFERENCES employer(_id)”
Upgrading the SQLiteOpenHelper
If you have followed the tutorial up to this point, you will have built an Employer table and inserted values already. If you do not change your database version, the new Employee table will never be created. Unfortunately, if you change the version, recall that the onUpgrade() method, as currently defined, drops the Employer table. To guard against this, you can comment out (or delete) the drop statement in onUpgrade(), and add an execSQL() statement to create the Employee table. Since the Employee table references the Employer table, you must create the Employer table first.
Display data from an SQLite database query in a Spinner
To create an Employee, the user needs to select the corresponding Employer. A good way to do this is to present a Spinner to the app user. Displaying the contents of a Cursor in a Spinner is pretty straightforward.
First, we perform a query as discussed above, fetching just the Employer name and id (queryCols). Next, we create a SimpleCursorAdapter instance passing it the Cursor, an array of columns to display (adapterCols), and an array of views that the columns should be displayed in (adapterRowViews). Then, we set the Spinner’s Adapter to the SimpleCursorAdapter.
Insert foreign key in database
Inserting a row containing a foreign key is completely identical to inserting rows in tables without foreign key constraints. The difference here is that we get a reference to the selected Cursor from the Spinner, and then get the value of the Employer _ID column.
Select from SQLite database using JOIN
Unfortunately, we can’t use the SQLiteDatabase’s query() method to query multiple tables. To query multiple tables, we must provide our own SQL query. In the sample, the query is defined in the SampleDBContract class.
Notice that we use the ‘?’ character in the WHERE clause in much the same way as described above for the query() method. To execute the provided SQL, we’ll need to define a selectionArgs String[] containing values that will replace the ‘?’s in our provided SQL query.
As usual, the complete source code isavailable on github, for use, reuse and misuse as you see fit. SQLite databases are very powerful, and it is amazing that it is available to all android apps, always. While it might be an overkill for most data storage needs, it’s an absolute godsend when you need it.
Thank you for being part of our community. Read ourComment Policybefore posting.
