Affiliate links on Android Authority may earn us a commission.Learn more.
Using Street View and Geocoding in your Android app
August 05, 2025
We’ve already looked at how you can use the Google Maps API toretrieve and display the user’s location, but this powerful API isn’t limited to sticking a pin in a map!
In this article, we’ll be looking at some of the additional features that are included in the Google Maps API. By the end of this article, you’ll know how to:

Creating a basic Google Maps app
Before we can implementanyof these features, we need to create a project that displays a basic Google Maps fragment.
To get this setup out of the way as quickly as possible, I’ll be using Android Studio’s ‘Google Maps Activity’ template and generating a debug API key, which is required if your project is going to displayanyGoogle Maps content. Just be aware that debug API keys aren’t particularly secure, so before publishing an application you mustalwaysgenerate a new API key based on your project’s release certificate.
If your project refuses to compile, then ensure your development environment is up to date, by opening the Android SDK Manager and installing any available updates – in particular make sure you have the latest versions of Google Play Services and Google Repository.
This is the bare minimum required to display Google Maps content, so at this point you may want to take this project for a spin by installing it on your physical smartphone or tablet, or an AVD (Android Virtual Device). If you’re testing this project on an AVD, then you’ll need to use a system image that includes the Google APIs.
Currently this project displays a map with a marker permanently set to Sydney, Australia. This isn’t exactly going to wow your users, so let’s look at a few different ways of making this project more interesting.
Displaying the user’s address with reverse geocoding
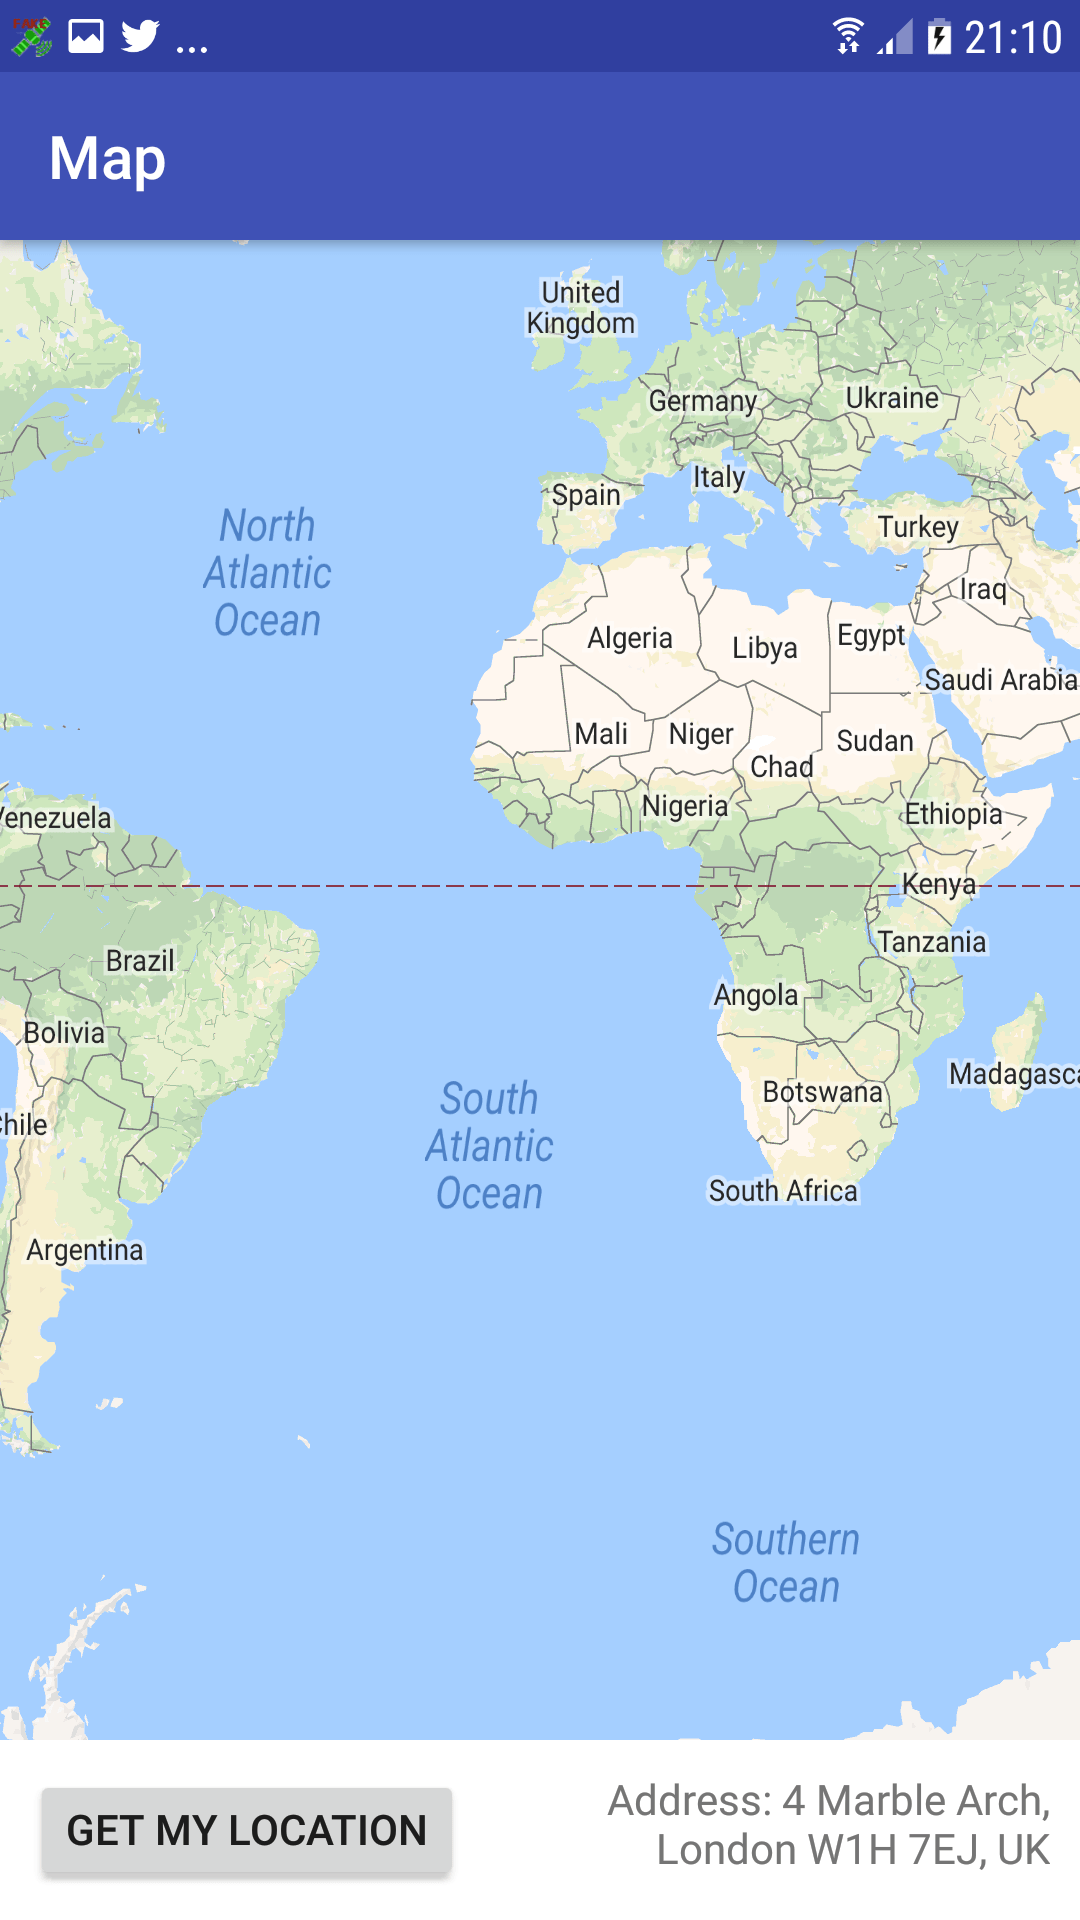
When you include Google Maps content in your application, you typicallydisplay the user’s current location via a marker, but there’s plenty of scenarios where it’s more useful to display location as a street address. For example, if you’re booking a taxi the old-fashioned way (i.e bycallingthe taxi company) or arranging to meet a friend, then knowing the street you’re currently on is going to be pretty useful!
While your userscouldwork this out for themselves by zooming in on their location marker and looking at the surrounding labels, you can provide a much better experience bypresentingthis information to them. This process of converting a set of longitude and latitude values into a street address, is known asreverse geocoding.
In this section, we’re going to add a button to our application that, when tapped, retrieves the device’s longitude and latitude, reverse geocodes these coordinates into an approximate street address, and then presents this information to the user.
Update your layout
Let’s start with the easy stuff, and update our user interface. When you create a project using the Google Maps Activity template, the activity_maps.xml file contains a SupportMapFragment that fills the entire screen.
I’m going to expand on this layout to include a ‘Get My Location’ button that, when tapped, updates a TextView with the reverse geocoded data.

Create your strings
Next, define the string resources that we’ll be using throughout this project:
The second string resource is a placeholder that contains the following:
You convert latitude and longitude values into a physical address using the getFromLocation() method, which returns a list of Address objects.
The level of detail returned by getFromLocation() will vary depending on the location. Sometimes reverse geocoding may return a full address, right down to the house number; sometimes it’ll return the name of the nearest building – and occasionally it may return no information at all.
While the latter is unlikely, your application shouldn’t crash if itdoesencounter this scenario. Here, I’m creating a String just in case this app can’t match the coordinates to any known address:
On devices running Android 6.0 (API level 23) and higher, applications need to request permissions at runtime, and the user can then accept or deny each request, on a permission-by-permission basis.
If the user denies a permission request, then you need to communicate the impact this will have on your application. In this project, I’m going to display the following text as part of a toast:
When working on your own Android projects, you may also want to disable or remove parts of your application that rely on the denied permission, for example removing items from menus, or “greying out” certain UI controls.
Add the Internet permission
Reverse geocoding requires an Internet connection, so open your project’s Manifest and add the Internet permission:
Create an AyncTask
Since reverse geocoding uses the network, it has the potential to block Android’s main thread. To avoid Application Not Responding (ANR) errors and application crashes, youmustperform the reverse geocoding operation off the main thread. There’s various ways of creating background threads, but I’m going to use an AsyncTask.
Create a new Java class (I’m naming mine ReverseGeo) and implement the AsyncTask:
Implement ReverseGeo in MapsActivity
Next, we need to implement ReverseGeo in our project’s automatically-generated MapsActivity class, and then override the onTaskComplete() method. I’m also implementing the onClickListener so our application can respond to the user tapping the ‘Get My Location’ button.
Testing your reverse geocoding application
Let’s put this application to the test:
Since we’re requesting the ACCESS_FINE_LOCATION permission at runtime, we need to test how our application handles rejection:
You should also test how your application functions when it has access to your location, but can’t match the coordinates to any known address. If you’re using a physical Android device, then you can test this scenario using a third party app:
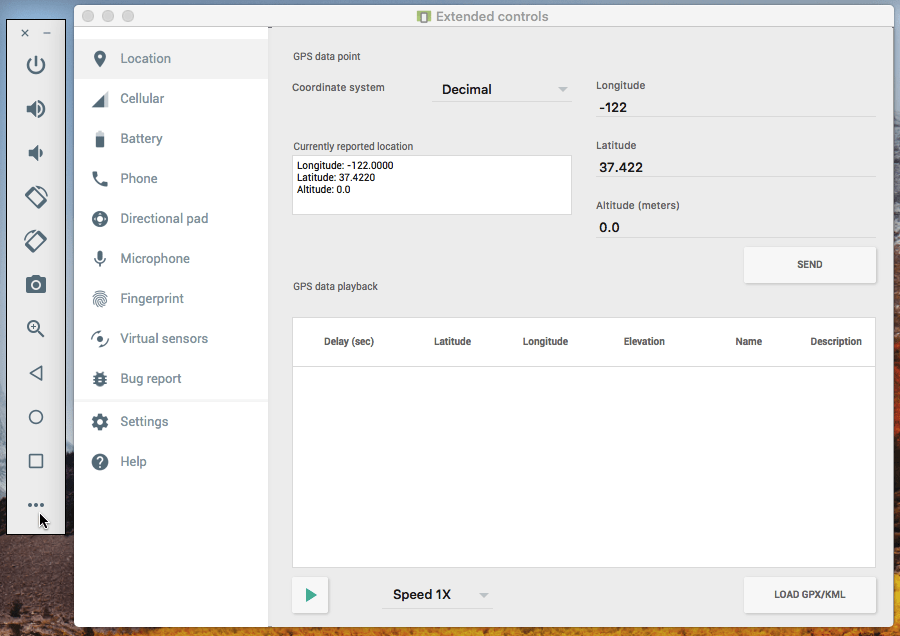
If you’re testing this project on an AVD, then you can change the device’s coordinates using the strip of buttons that appear alongside the emulator:
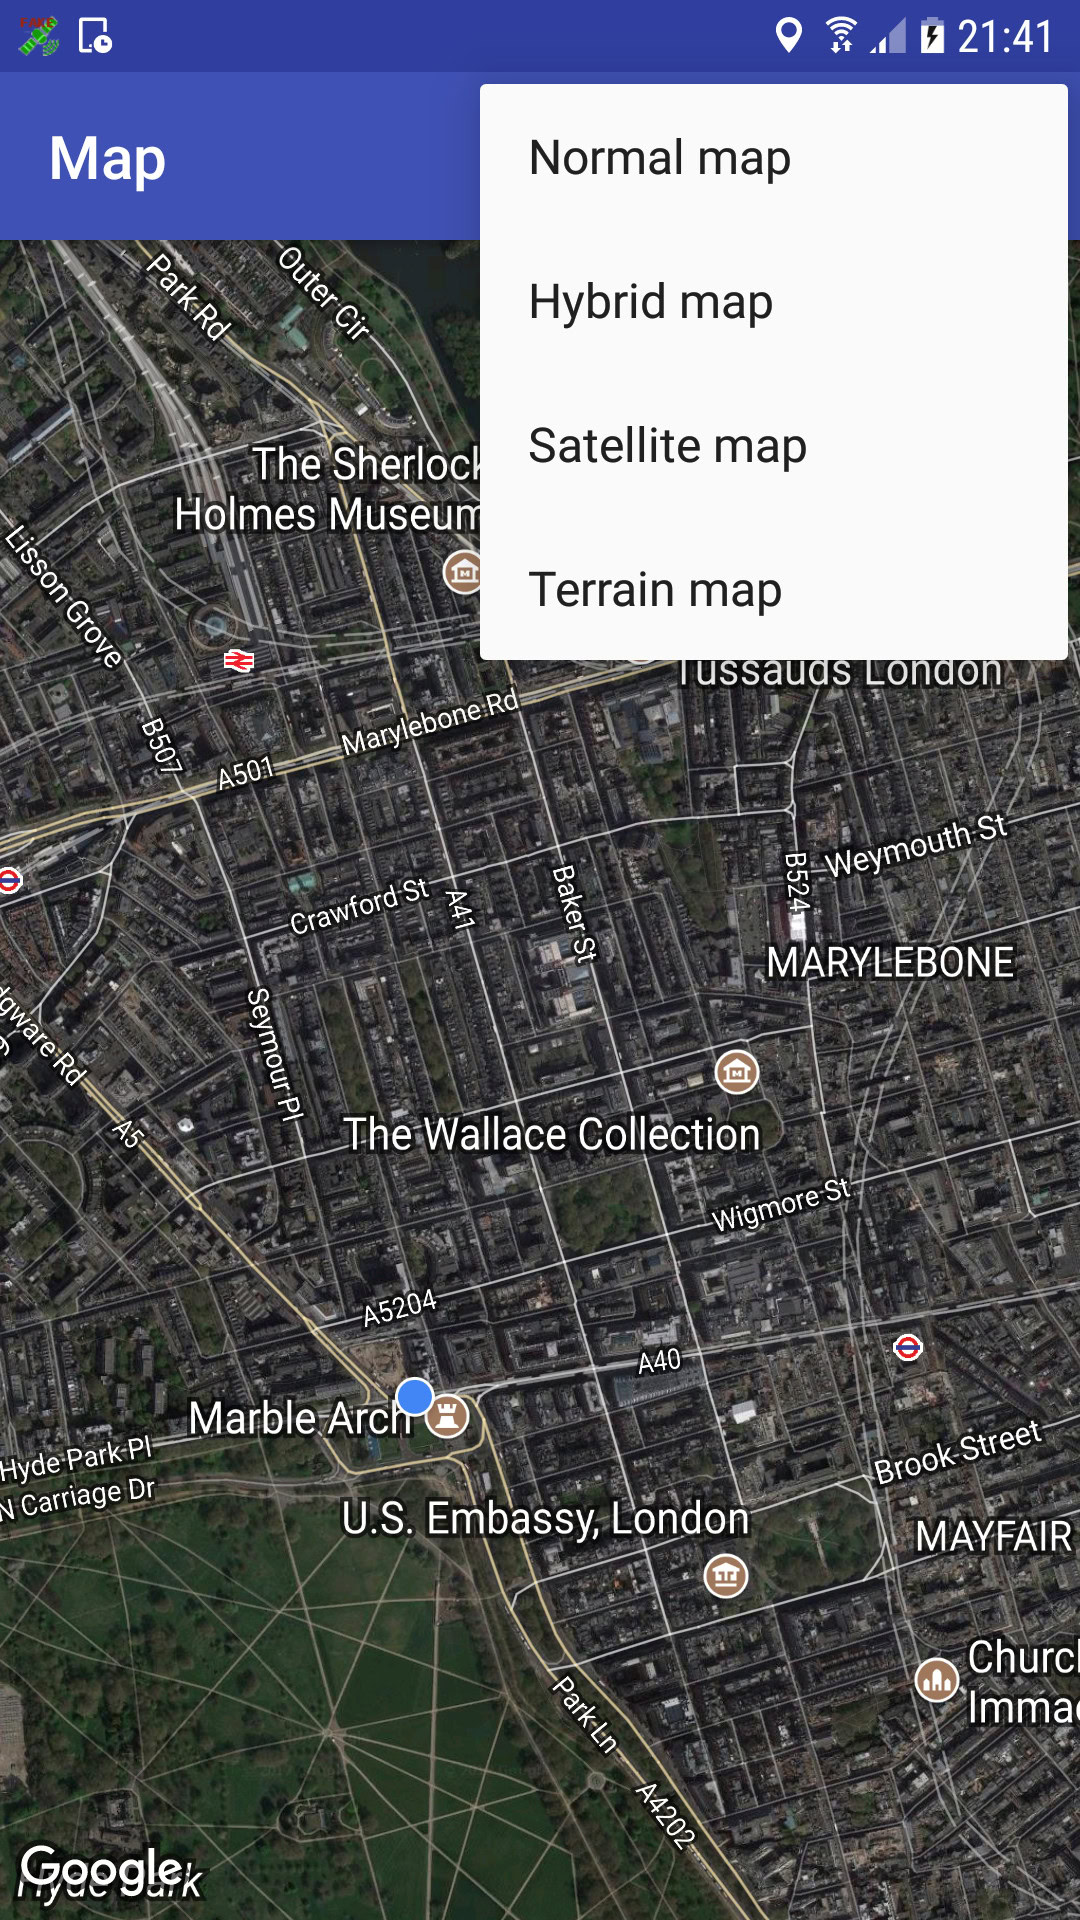
Adding different map types
Any Google Maps content you include in your app will use the “normal” map style by default – but “normal” isn’t the only option!
The Google Maps API supports a few different map styles:
To display anything other than a “normal” map, you’ll need to use the setMapType method:
Alternatively, why not give your users the freedom to switch between map styles?
In this section, we’re going to add a dropdown menu that allows your users to move between the normal, hybrid, terrain and satellite map styles, with ease.
Start by creating a menu resource:
Open your project’s strings.xml file and define all the menu labels:
Next, you’ll need to implement the menu in your MapsActivity. To make this process clearer, I’ve removed all geocoding-specific code from this Activity.
Install the updated application on your physical Android device or AVD, open the menu, and test all the different map styles.
Adding Street View to your project
Even examining the same location across multiple map styles can’tquitecompare to the experience of exploring that location from a first-person perspective – which is where Street View comes in.
In this final section, I’ll show you how to provide a tangible sense of what a location isreallylike, by integrating Street View into our application.
Let’s start by updating our layout:
Next, I’m going to create a StreetViewActivity, where I’ll implement the Street View service. When you include a Street View panorama in your application, all the standard Street View actions are included by default, which is why the following code doesn’t contain any manual implementations of panning and zooming gestures, or navigating to adjacent panoramas, as you already get all this functionality for free!
Since I’m displaying the Street View panorama inside an Android View, I’m using StreetViewPanoramaView, which is a subclass of the View class. To display a panorama inside a Fragment, you’d use StreetViewPanoramaFragment instead.
Don’t forget to add the StreetViewActivity to your Manifest:
Finally, we need to implement launchStreetView in our MapsActivity, so that android:onClick=”launchStreetView” triggers the StreetViewActivity class:
Install this project on your Android device, and give the ‘Street View’ button a tap. Your application should respond by launching a new Activity displaying a 360 degree panorama of the London Eye.
Wrapping Up
In this article, we explored a few ways of enhancing your app’s Google Maps content, by adding support for Street View, multiple map styles, and reverse geocoding – but these are still just a few of the features that the Google Maps API has to offer.
What Google Maps features have you used in your own projects? Let us know in the comments below!
Thank you for being part of our community. Read ourComment Policybefore posting.
